Advanced configuration with the CLI
Agama offers a command-line interface (CLI) that can be used to drive and monitor the whole interactive installation process, completely replacing the graphical web interface if desired.
But the command-line interface can also be used as a complement for the graphical web interface. Bear in mind the web interface only exposes a small part of the configuration capabilities of Agama. It is perfectly possible to use the web interface for most of the process and rely on the command-line only to tweak those aspects of the configuration that cannot be managed there.
Local access to the command-line tools
The first step to use the Agama command-line tools from the Agama Live installation media is to open
a Linux console session as the user root. The easiest way to do show is to switch to one of the
text consoles, for example pressing Ctrl+Alt+F1. Then you can log in as root using any
password you may have setup during boot or just typing the
password you can find right above the login prompt. Notice that this password is freshly generated;
it's different each time the live system boots. Alternatively, you can switch to Ctrl + Alt +
F8 where no authentication is required.
Once you are logged as root, you have the agama command at your disposal.
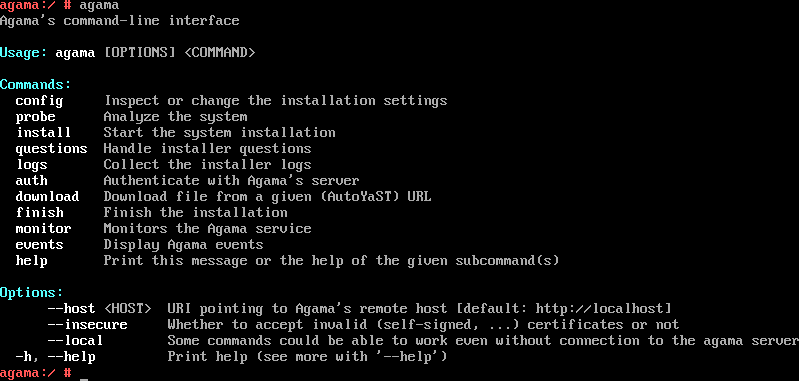
As a starting point, you can execute agama config show to display the current settings. If you
want to inspect that configuration in a more convenient format, you can combine that with other
commands also available in the live system. For example, you can try the following.
agama config show | jq -C | less
You can switch back and forth between the graphical console and several text consoles using key
combinations like Ctrl+Alt+F1 or Ctrl+Alt+F2... Ctrl+Alt+F8. The graphical
interface can usually be found at the second console or at the seventh, depending whether the live
system is based on Wayland or X.Org. You can learn more about text consoles in the
corresponding section of the document about collecting
installation logs.
Remote access to the command-line tools
You can also use the Agama command-line to manage the installation from another machine in the same network. The obvious way to achieve that is to just open a root SSH session to the installation machine. Everything will work exactly the same than using a local text console.
But asuming you have the Agama command-line tools installed on your system, you can also control the installation process of any other machine as long as you know its name or IP address at the local network.
For that you first need to authenticate into the system using the password of the user root.
agama --host https://agama.local auth login
In some cases, it may be convenient to also add the argument insecure if you are in a fully
thrustworthy scenario and you want to skip the verifications for a self-signed SSL certificate.
agama --insecure --host https://agama.local auth login
Once you are logged in, you can perform any operation. For example, you can display the current configuration.
agama --host https://agama.local config show
Adjusting the configuration
As mentioned, the command-line interface of Agama can be a nice complement to the graphical instalation. Let's start with a trivial adjustment. You could create the following partial configuration file to adapt the root password of the installed system.
{
  "root": {
    "password": "s3cr3t"
  }
}
Then, you could load that configuration with a command similar to this.
agama config load secret.json
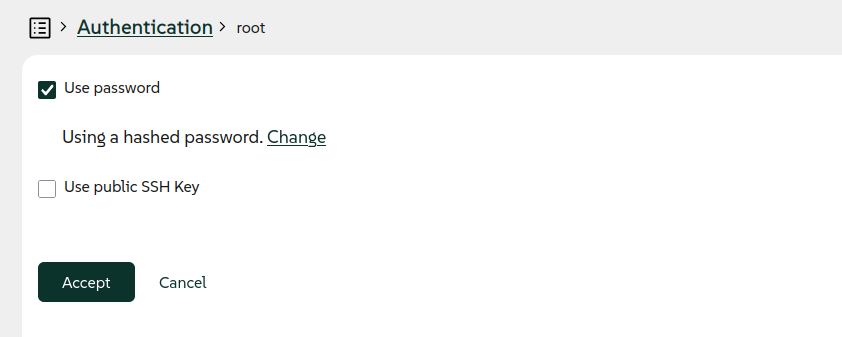
At that point, if you browse to the Authentication section of the web interface and click on the icon to reveal the password, you could see it was effectively updated!
Needless to say, the loaded JSON document can contain a full Agama configuration or only a partial one like in the example. In the latter case, the settings corresponding to the omitted sections will not be modified.
Of course, you can also rely on other tools to simplify the process, for example something like this would save you from manually creating the JSON file.
jq -n '.root.password = "s3cr3t" | agama config load
The CLI allows you to achieve some things that cannot be done using only the web-based user interface. For example, you could load the following partial configuration.
{
  "root": {
    "hashedPassword": true,
    "password": "$y$j9T$qGMrxRmEHUV33MD8srkPV1"
  }
}
Although the web interface does not allow to enter an already hashed password for the user root,
you can still check the result there.
Furthermore, this approach makes it possible to modify those configuration options that are not even visible at the graphical user interface. Let's say you want to tweak the configuration of the boot loader in some special way and you want to do it using Agama, so the configuration is already applied on the first boot of the new system. In that case you could create and load the following partial configuration and continue with the installation normally.
{
  "bootloader": {
    "stopOnBootMenu": true,
    "extraKernelParams": "processor.max_cstate=1"
  }
}
When logged in at the installation media, a more convenient method can be used to modify the current configuration. Just run the following command.
agama config edit
That will open the default text editor (usually Vim) with the current configuration already loaded. Then configuring Agama is as easy as editing that JSON configuration and then saving the file and quitting the editor.

Of course, it is also possible to express the configuration in the more dynamic (and usually more convenient) Jsonnet format, but that requires some previous processing that is better described at the corresponding section of Agama's user documentation.
Driving the whole installation process
This document is focused on how to combine the web-based user interface and the command-line to get the best of both worlds. But actually the command-line interface is enough to interactively drive the whole installation process. The following sequence of commands should be enough for the simplest scenario.
agama config edit
agama install
agama finish
There are many other commands that can be useful. All of them are described at the command-line reference.